
How many times have you accumulated egg cups at home that you didn’t know what to do with them? After a while, when you have accumulated enough or have papers to take to the recycling bin, you throw them away.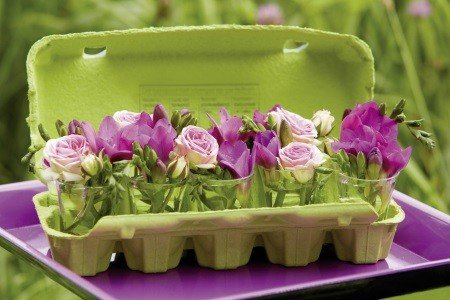
If you are interested in recycling, you will surely find this article where we tell you how to recycle at home.
Did you know that you could take advantage of them? Today we are going to give you a few ideas to decorate your home with this very resistant material.
What do you need to reuse the egg cups?
Sewing box
- White rubber.
- One of those pads that come inside the cases.
- Spools of thread.
- Buttons.
- Craft silicone gun.
- Meter.
- Scissors.
- must-see
- 1 half dozen egg cup with lid.
- Kitchen paper.
Photo frame
- Egg carton.
- Cardboard from a box of cookies. Glue gun.
- Spray paint.
- White glue.
- Scissors.
- Pencil.
- A picture.
- Rule.
- Long toothpick for Moorish skewers.
- Fine metal chain.
- Beads or stones.
Planter
- Land.
- Paper cups.
- Floors.
- Water.
Instructions for reusing egg cups
Sewing box
- Clean the inside of the egg cup with a cloth or kitchen paper.
- Measure the inner rectangle of the cape, cut the fabric that is double and leave about half a centimeter on each side.
- Place the pad under the fabric and sew it at the end. The pad will only take up half of the fabric.
- Hem all the way around the fabric.
- On the other half, the one that is not padded, sew a small rubber band 10 cm long.
- Glue the ends of the fabric to the inside lid of the egg cup. For this use silicone. Apply it to the edge of the fabric.
- Let it dry for an hour.
- Now you can use your sewing kit. In the rubber you can insert the scissors, in the cushion the safety pins and the hollowed-out area you can leave various sewing utensils, such as the pincushion, spools of thread, buttons… or whatever you can think of.
Photo frame
- We take a cardboard cookie box and keep one of the largest parts, usually A4 size. And we reserve the other side.
- We will put the photo on top, centering the photograph and we will mark the four corners on the cardboard with a pencil.
- Next, with the ruler we will join the points to form a rectangle.
- We will try to leave 10 cm on each side of the rectangle on the outside (this will depend on the size of the image).
- Cut out the rectangle where we had previously placed the photo, as well as what is left over from the sides.
- We take the other cardboard and put it on top, both have to have the same length and the same width.
- Trim what is left over.
- With white glue, proceed to glue both longer sides.
- Now it’s time to make the flowers for the frame. Cut all the squares out of the egg cup. Then give them a round shape.
- Fold it in half, flatten it well and make a cut in the beak, there will be a hole in the center and it will open on one side.
- Now shape it into a flower petal by making wavy cuts on the outside. This is how we will do it with all the little squares that we have cut out.
- With the help of a long toothpick, turn the tip to start rolling.
- When we have the piece of cardboard rolled up, we give it a touch of silicone at the end so that it does not open.
- Cut the tip so that the flower lies flat.
- We take another petal and roll it up again on top of this one that we had already glued with silicone. To make it easier for you, you can add a drop that allows you to hold the new petal before continuing to roll it. The idea is that it looks like a rose.
- When we finish rolling, we cut the tip again so that it is flat.
- Continue making more roses. The number will depend on how ornate you want to make the frame.
- Once finished with the roses, we are going to glue them to the frame with silicone. Here your creativity comes into play, so the order and number of flowers in the frame will depend on your tastes.
- In order to hang the picture frame, we glue a ribbon or chain on the back.
- To reinforce the chain we glue a cardboard square on top.
- Spray paint the frame the color you like best.
- Once the frame is dry we can add little stones that we will glue with silicone. When everything is dry we can introduce the photograph.
Planter
- We can also do a simpler activity that requires less time and does not require much skill in crafting. A gardener. For this we have two options:
- Directly fill the cavities of the egg cup with soil and plant the seeds or plants.
- The second option is as follows: Place glasses in each of the cavities.
- Poke a small hole in the bottom of the glass.
- You fill it with soil and plants whatever you like.
Tips for reusing egg cups
- In the case of the photo frame, instead of cutting out the egg cup squares with scissors, you can use your own hands.
- In the planter it is recommended to perforate the glass so that the plants can drain the water they do not need.
- Another option for the gardener is that the glasses instead of earth have water and we deposit aquatic plants in them.