
Horses are one of the most beautiful and noble animals with which a human being can have contact. They are animals that transmit a lot with their eyes and aesthetically they are pure beauty.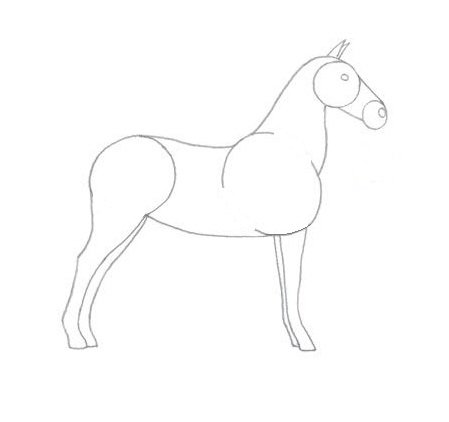 A really beautiful image is a horse with a natural landscape in the background. It is also easy to learn how to draw a tree to portray the horse in the middle of nature. Many people like to draw horses since it is an animal with which we have a good relationship. This choice offers us many possibilities when trying to draw them. One of the varieties is the position of the horses. They can be in their normal posture, raising both legs or galloping. Each of these positions entails a difficulty inherent to the posture and environment.
If we want to draw this valuable animal, before choosing the position or conditions of the drawing we must learn how to draw a horse, the bases on which to act and some tips to carry them out so that our work is more bearable and effective.
It is also important to take into account the proportions since, more or less, there are some measures stipulated so that the drawing is as realistic as possible if that is the objective that is to be achieved. With the advantage of the Internet, it is not necessary to be in front of a horse or spend hours observing one in person, since we can be inspired by any video or photo that we find on the web and with which we feel identified and motivated to start drawing the first lines. of our project.
In this article you will find some instructions and steps to follow. Also tips to improve or adapt the necessary techniques to your way of drawing. When you control these techniques you will be able to improvise or vary nuances that you consider appropriate. You will make them more in line with your tastes or way of expressing yourself. For this you will need practice and exercises to master the steps to follow in all its facets.
Instructions for drawing horses
As we have mentioned in the article, it is important to be familiar with the figure of the horse, which is not an obstacle thanks to the Internet and the amount of photos that we have. Next we will talk about the first steps to take and the bases on which to move forward to have our drawing.
It is important to observe and study the anatomy of the horse to have a clear image in our mind when we start drawing the parts of the body, whether we draw it still or making some kind of movement.
If we are not clear about it, before deciding if we want the horse to be still, galloping or on two legs, it is important to be clear about how to represent its body parts since it is the main thing. Once we have controlled the shapes and parts of the animal’s body, we can choose an image and represent it to our liking.
To start drawing your figure we will start by drawing each part of the body separately using easy ways to represent on paper.
- For the head we will draw a large oval circle and we will use two more circles for the rest of the body. One of these circles will be located about three centimeters below the head and displaced to the left. The other circle will maintain a distance of four centimeters from the other circle and will be significantly smaller.
- With two lines we will join the head and the body thus forming the neck of the figure.
- We will get the figure of the legs with straight lines and small circles for their joints.
- The muzzle will be represented by another circle considerably smaller in size than the head.
- Once the head is drawn we can draw the respective ears and eyes. It is important to know how to draw an eye as well as to know how to draw a face. With this ability we will know how to give our drawing more realism.
- A good way to tell the size of the horse is that it will usually fit in a square.
This exercise is important since the first objective is to achieve a certain level of ease when drawing the figure of the horse in a simple way on which we can move forward and give some touch-ups. Once this exercise has been achieved and finished, we will be able to get down to work with the drawing of a horse with a more realistic appearance from this line.
With the image of a horse in sight while we make the drawing to keep in mind the shapes in each of the simply drawn parts, we will proceed to perfect each one of them, as well as complete the small details by adding the eye, the tail or the mane. For the helmets we can use triangles in each of them as a guide to later give them the desired shape. For this reason it is important to know all the details of the horse’s anatomy and its characteristics.
Once we have the image of the horse, it will be enough to give them the most realistic shape based on said photo to finally choose the colors. Dark colors help to give more realism and shadows to the drawing.
If we want to add a landscape to our design, we must take it into account before starting our task and combine it in the best way, to our liking, with the figure of the horse.
What do you need to draw horses?
To get our desired horse we will need a series of tools so that it turns out as we want and these tools are:
- A desk large enough to fit the tools and not be piled up or interrupt the movements of our hands, as it could hinder the strokes and complicate the task.
- A sheet or sheet large enough to make the drawing of the previously decided size.
- A rule.
- A pencil that we will use to make the sketch. It is important to paint lines that are strong enough to be visible but soft enough to be hidden when developing the shapes.
- A pencil sharpener to have the tip of the pencil in optimal conditions since it is recommended that it be capable of making very fine and smooth lines or strokes.
- An eraser to correct any mistake in the sketch.
- Colors with which we feel more comfortable and we like more to illustrate. If the main color is dark, we can combine them with distinctive white details or “spots” of some horses.
- The image of the horse that you want to draw or on which we want to be inspired.
We will also need to be in a space where we are calm and without distractions since it is advisable to be fully concentrated on the task so as not to overlook any detail. Avoid using the television or mobile to be immersed in the drawing.
If we feel more secure when drawing lines with a grid sheet because it is easier to measure distances and have references between objects and the total size of the body, we can use them instead of a sheet. As we progress and develop the technique, we can opt for the blank page as it will be more beautiful.
Tips for Drawing Horses
- Having high expectations about the result of your work is good since it encourages us to improve, practice and perfect the techniques, but, on the other hand, it can also be negative if it is taken to the extreme as it can lead to frustration and finally to the blocking or abandonment of the project.
- Doing it the way we have thought or envisioned on the first try is practically impossible. Everything takes a process in which we can improve and see the results drawing by drawing. For this it is important to be constant and not get discouraged since mistakes or failures are part of the way to learn.
- By keeping all your drawings, no matter how bad they may seem, you will be able to identify the failures, the parts to improve and what is well drawn. At this point, you can keep what you like and improve the rest. That is why it is positive to never throw out the essays no matter how angry or disappointed you are with the result.
There is no need to be afraid of criticism or ashamed to show your progress as you could benefit from advice or different points of view as you can use them to your advantage for the next drawing session. - The environment in which to carry out the activity is essential. It must be a clean environment, without distractions and optimal to be able to be relaxed. Music that connects us with our most relaxed and confident part of ourselves will help us unleash our potential.
- Our position during the exercise must be comfortable, so an office chair is ideal and a table that is wide enough. Sitting is the ideal position since lying down we would not have the ideal range of movement for the neck or our concentration.
Finding our moment in the day is essential to do it in the best conditions, as well as not doing it every day since we could fall into an overload and collapse or mental fatigue. Ideally, do it three or four times a week. - Finally a caution that we must adopt is not to lean our hands on any part of the paper since we could dirty it or wrinkle part of the drawing.
With these tips we will be able to improve and develop all our qualities to achieve a touch of realism or determine our own style.